New Quick Assists in Flash Builder 4.7 Beta

Flash Builder 4.7 introduces new quick assists to increase productivity and faster refactoring. Those of you who don’t know about Quick Assist/Fix, please refer http://www.adobe.com/devnet/flash-builder/articles/flashbuilder45-coding-enhancements.html

To invoke Quick Assist, place cursor anywhere in editor and press CTRL+1 (CMD+1 on Mac).

1. Assign parameter to new field/existing field

It is mostly used in constructors’ parameters. Situations where you want to create a new instance variable and assign parameter to it. You can cycle through different variables and namespaces by pressing TAB. Press ENTER to come out of “Linked Mode”.

Before

After

2. Convert local variable to parameter.

This is very similar to ‘Convert local variable to field’ added in previous versions of Flash Builder. You use it whenever you want to quickly convert a local variable inside a function to function’s parameter.

Before

After

3.  Create new local variable with cast type

We obviously do lot of type casting in our programs. To make sure what we are casting on is compatible we usually verify it in runtime by using ‘is’ in an “if” statement. This quick assist allows you to create a new variable with casted type. Also available when invoked on “while” statements. Again, you can cycle through variable and its type by pressing TAB. Press ENTER to come out of it.

Before

After

4. Convert anonymous to named function

As the name suggests, this quick assist converts anonymous function to a named function. For example, you have an anonymous function as a parameter to addEventListener method call. As your code grows bigger inside this function, you will want to move this function to named function and use only function reference as parameter to increase code readability. Use this quick assist in those situations.

Before

After

5. Replace conditional with ‘if-else’ statement

Suppose in your code you have a conditional statement(using ternary operator ?:). You may want to use this quick assist to convert conditional to ‘if-else’ statements in situations where you want to add more statements if one condition is true or false.

Before

After

6. Add else, else if, catch, finally blocks.

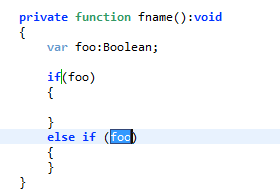
No explanation needed i guess. Use it for quick generation of else, else-if, catch, finally blocks :-). Plus, add-elseif proposal uses local boolean variables in generated code when applied

Before

After

Make a habit of using ctrl+1. It saves time 🙂

Posted in Uncategorized | Tagged , , | Leave a comment

Real-time error highlighting in Flash Builder 4.7 Beta

All Flash Builder 4.5/4.6 coders might have used this nice feature called ‘Live error highlighting’. It shows an orange squiggly mark in editor whereever undefined references are used.

In Flash Builder 4.7 this feature is more advanced. We get to see all kinds of errors, not just undefined references (Syntactical/Semantic compiler errors) as and when you type something. However, this feature is enabled only for ActionScript and ActionScript Library project.

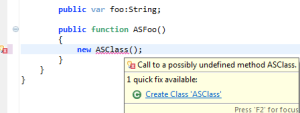
What else? How do you use this feature effectively? Flash Builder provides Quick Fixes for undefined reference errors. If the compiler error at the point can be fixed by Flash Buider’s “Quick Fixes”, you will see a light bulb icon on the left ruler of current editor.  There are many ways to apply Quick Fix to a problem.

1. Click on that light bulb icon to invoke Quick Fixes for that particular problem. All available proposals are displayed.

2. Mouse hover on any undefined identifier. It should popup a small window with all available Quick Fix proposals. Select any of them to apply the “fix” on editor.

3. Invoke Quick Fix by pressing the classic shortcut Ctrl+1(CMD+1 on Mac). Flash Builder moves your cursor to the start of undefined reference and displays all available Quick Fixes.

4. Apply Quick Fix from Problems View. Right click on the error and click on “Quick Fix”. Select any of one of the proposals from the table in dialog.


Happy AS3 coding!

Posted in Uncategorized | Leave a comment

Flash Builder 4.7 Beta is now LIVE

Get it here http://labs.adobe.com/technologies/flashbuilder4-7/
Loads of new features including NEW compiler for ActionScript projects.
Happy coding.

Posted in Uncategorized | Leave a comment

Flash Builder Burrito Preview release is live on labs!

Flash Builder Burrito Preview release is now live on labs.

Get it here. http://labs.adobe.com/technologies/flashbuilder_burrito/

Comes with lots of new features like coding productivity and mobile workflows.

Cheers,

Radhakrishna

Posted in Uncategorized | Leave a comment

Using convertParametersHandler in Flex 4

There is avery handy API in Flex 4 RemoteObject and WebService. It lets you manipulate/validate parameters before calling the actual operation.

Suppose I have imported WebService http://ws.cdyne.com/WeatherWS/Weather.asmx?wsdl in FlashBuilder 4 . The service basically gives weather information.  I want to validate/Change parameter ‘ZIPCODE’ of ‘GetCityWeatherByZIP’ when a service call happens. Here is what you need to do. In servicename.as class,

public class Weather extends _Super_Weather
{

	public function Weather() {

		_serviceControl.convertParametersHandler = convertParameterHandler;

	}

	public function convertParameterHandler(o:Array):Array {
//Dummy validation. If user gives '210' as value. Prefix it with '90' (Beverly Hills:-)
		var str:String = o[0];
		if(str.substr(0,2)!="90") //User gives only last 3 digits
			str = "90"+str;
		o[0] = str;
		return o;
	}

}

}
Posted in Uncategorized | Leave a comment

Setting up Django and PyAMF to use Python models objects in Flex using RemoteObject

This post is only about setting up and installing Django and PyAMF. And a simple example of  Flex Client using RemoteObject.

Click here to know about and download Django and PyAMF. Prerequisites are Python 2.5 or 2.6. 3.0 is not yet supported by both of them.

Download and extract Django to a Directory. cd to it.

python setup.py install

To setup projects and apps, read this, http://docs.djangoproject.com/en/dev/intro/tutorial01/#intro-tutorial01

Download and extract pyAMF to a dir and cd to it.

python setup.py install

copy the ‘pyAMF’ directory which is under ‘build/lib.win32-2.6’ directory inside your extracted PyAMF folder. Paste it under $PYTHONHOME\Lib\site-packages.

I have created a Project and App and dir structure looks like this.

D:\
   DjangoProjects\
       proj\
           manage.py
           settings.py
           urls.py
           empl\
                  models.py
                  tests.py
                  views.py

I have written a simple model and a method getAllItems inside models.py. Here is the code.

from django.db import models

def getAllItems(self):
    rows = Employees.objects.all()
    return rows

class Employees(models.Model):
    emp_no = models.IntegerField(primary_key=True)
    birth_date = models.DateField()
    first_name = models.CharField(max_length=42)
    last_name = models.CharField(max_length=48)
    gender = models.CharField(max_length=3)
    hire_date = models.DateField()
    class Meta:
        db_table = u'employees'

Now if we want to invoke getAllItems from Flex, we need to add a gateway file . Here is my gateway.py under empl app.

from pyamf.remoting.gateway.django import DjangoGateway

import proj.empl.models as models

services = {
    'Employees': models
    # could include other functions as well
}

echoGateway = DjangoGateway(services)
#UPDATE: Pass expose_request=false parameter to DjangoGateway to skip http request object as a mandated parameter.

Here, note that inside services, ‘Employees’ is going to be your ‘destination’ of RemoteObject in Flex.
Update your URLConf like this. I am re-directing URL anything ending with gateway/ to my gateway.py.

from django.conf.urls.defaults import *
from proj.empl import gateway

# Uncomment the next two lines to enable the admin:
# from django.contrib import admin
# admin.autodiscover()

urlpatterns = patterns('',

    ('^gateway/$', gateway.echoGateway)
)

We have successfully configured our Django/PyAMF. Let us write a simple Flex client to invoke getAllItems(). Our Remote Class here would be models with destination as ‘Employees’. I am using Flex 4 beta here.

<?xml version="1.0" encoding="utf-8"?>
<s:Application xmlns:fx="http://ns.adobe.com/mxml/2009"
 xmlns:s="library://ns.adobe.com/flex/spark"
 xmlns:mx="library://ns.adobe.com/flex/halo" minWidth="1024" minHeight="768" initialize="application1_initializeHandler(event)">
 <fx:Script>
 <![CDATA[
 import mx.rpc.http.Operation;
 import mx.controls.Alert;
 import mx.events.FlexEvent;
 import mx.rpc.events.FaultEvent;
 import mx.rpc.events.ResultEvent;
 protected function test_resultHandler(event:ResultEvent):void
 {
 dg.dataProvider = event.result;
 }

 protected function test_faultHandler(event:FaultEvent):void
 {
 Alert.show(event.fault.faultDetail);
 }

 protected function application1_initializeHandler(event:FlexEvent):void
 {
 test.getAllItems();
 }
 ]]>
 </fx:Script>
 <fx:Declarations>
 <mx:RemoteObject id="test" endpoint="http://localhost:8000/gateway/"
 destination="Employees" result="test_resultHandler(event)" fault="test_faultHandler(event)">

 </mx:RemoteObject>
 </fx:Declarations>
 <mx:DataGrid id="dg"/>

</s:Application>

Start your Django development server from inside Django project.

python manage.py runserver

.

Run the application and check your data in DataGrid:)

After running my Flex client

After running my Flex client

Posted in Uncategorized | Tagged , , , , | 2 Comments

A simple sample Twitter Client using ActionScript APIs

Hello all,

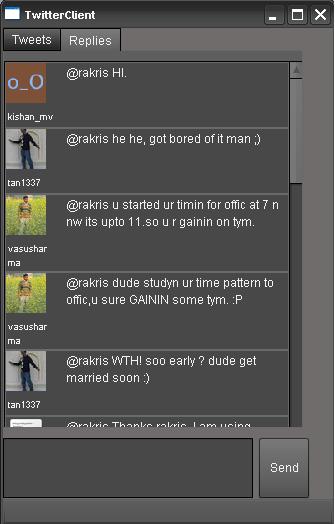
I used “TwitterScript” ActionScript APIs to develop this simple twitter client. There is no help or documentation about the classes available inside that SWC. But we can figure out by looking at method signature names.

Here is the Screenshot.

TwitterClient

Here is the *.air file.
TwitterClient

Here is the source code.
Source code

Posted in Uncategorized | Tagged , , , , | 2 Comments

Creating YouTube App in Flash Builder 4 using PHP Service

Flash Builder 4 has many cool features. One of them is Data Centric Development (DCD). Here is one cool sample app created using Flash Builder 4 beta.

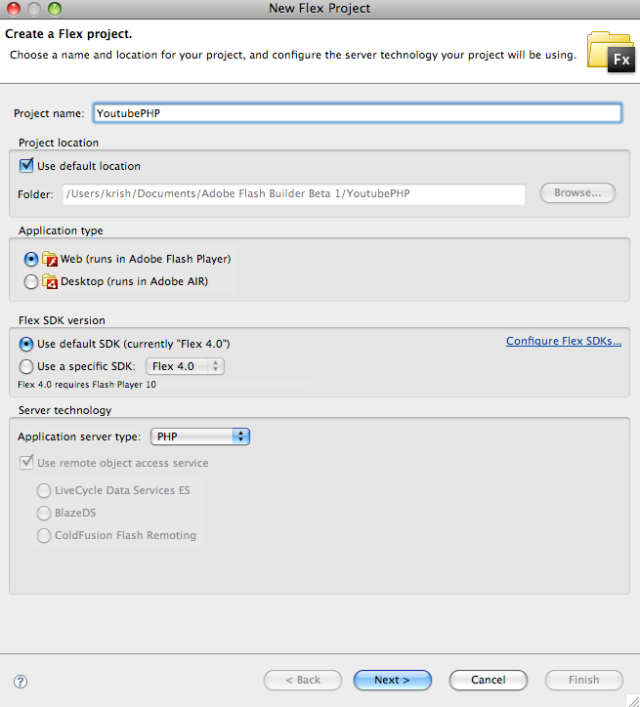
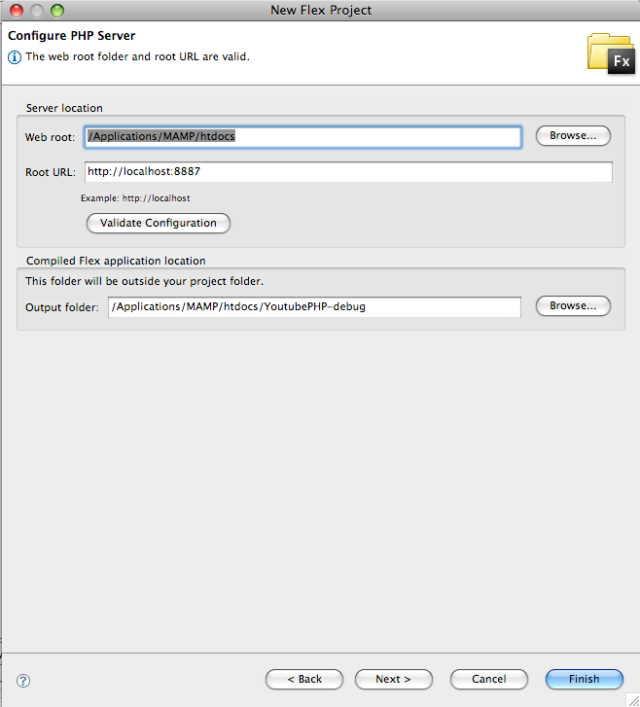
  • Create a Flex Project with PHP Server type as shown in screenshot below

Creating Project.

Creating Project.

  • Enter the WebRoot and RootURL for your Server. I am using MAMP as my server

    .

Enter the Web Root

Enter the Web Root

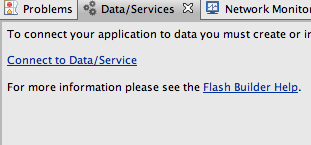
Click FINISH. Now in order to connect to any data, we are gonna have to create a service for that. Click on ‘Connect to Data/Services’ link in Data/Services View.

Connect to service

Connect to service

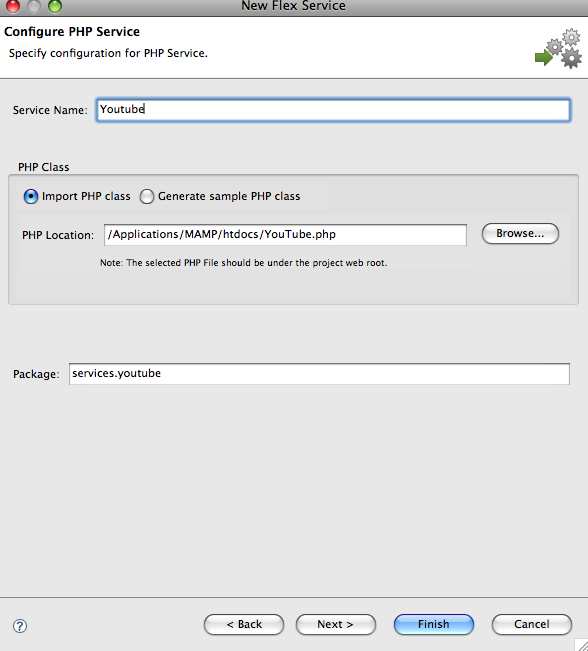
  • Select PHP, and enter service name and import the required PHP file

    .

I am using the PHP Code YouTube which i referred from http://www.ibm.com/developerworks/xml/library/x-youtubeapi/ . It basically returns the few entries from the feed it received.

Picture 6

Click on Finish. Now you can see a Service has been created in DataServices view. Context Click on getMostViewed() function and click on ‘Configure return type’. This step is required because in order to bind the returned data, we do need to know the type of the object it returns.

Enter ‘Videos’ as the name of the newly created data type and click next. Change the type of the argument ‘you_url’ to String and enter its value as ‘http://gdata.youtube.com/feeds/api/standardfeeds/top_rated&#8217;. You can give any youtube feed as argument to this. This is just to configure our return type. Click Next and finish. The returned Object is analysed now.

  • Binding data to the components

Picture 7

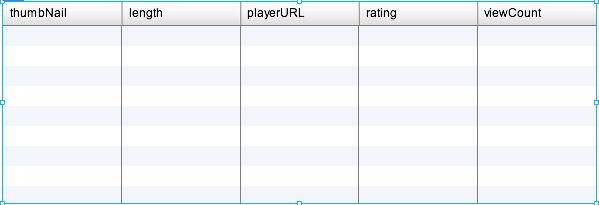
Now we want to Bind this data to a DataGrid component in Flex. Open MXML file, switch to design view. Drag and drop a DataGrid from the components view. And now for the best part. Drag and drop getMostViewed() function from Data/Services view onto the DataGrid. The DataGrid gets bound to the data with appropriate column names. After it switches to source view for you to enter argument, enter any feed you want. Say, ‘http://gdata.youtube.com/feeds/api/standardfeeds/top_rated&#8217;. Save the file and just run it.

CONGRATS. You have developed an amazing application within a few minutes. 🙂

If you want to make this application more beautiful, lets do some tiny configurations:)

  • Add a List with many feeds to make this application Dynamic.

Copy the following code and paste it in your MXML file.

<s:List labelField="value" x="44" y="85" id="iList" selectionChanged="dataGrid_creationCompleteHandler(event)" selectedIndex="0">
       <s:dataProvider>
           <mx:ArrayCollection>
              <fx:Object value="Top Rated" url="http://gdata.youtube.com/feeds/api/standardfeeds/top_rated"/>
              <fx:Object value="Top Favourites" url="http://gdata.youtube.com/feeds/api/standardfeeds/top_favorites"/>
              <fx:Object value="Most Viewed" url="http://gdata.youtube.com/feeds/api/standardfeeds/most_viewed"/>
              <fx:Object value="Most Popular" url="http://gdata.youtube.com/feeds/api/standardfeeds/most_popular"/>
              <fx:Object value="Most Responded" url="http://gdata.youtube.com/feeds/api/standardfeeds/most_responded"/>
              <fx:Object value="Most Linked" url="http://gdata.youtube.com/feeds/api/standardfeeds/most_linked"/>
              <fx:Object value="Recently Featured" url="http://gdata.youtube.com/feeds/api/standardfeeds/recently_featured"/>
              <fx:Object value="Watch on Mobile" url="http://gdata.youtube.com/feeds/api/standardfeeds/watch_on_mobile"/>

        </mx:ArrayCollection>
     </s:dataProvider>
</s:List>

Align List and DataGrid accordingly in Design view. Change FlexEvent to Event type in dataGrid_creationCompleteHandler() function. Now instead of hardcoding argument for youtube.getMostViewed() function we will pass List’s selected Item. Replace the argument with iList.selectedItem.url .

Hold on. Don’t run it now. Lets add more colors:). Now we want to show the thumbnail image of the video and add a link to view it in youtube finally.

  • Adding an ItemRenderer for thumbNail column of DataGrid.

Copy the following and edit your MXML file. I have added image as item renderer for thumbNail column and Linkbutton for playerURL.

<mx:DataGrid x="205" y="78" height="384" width="812" id="dataGrid" creationComplete="dataGrid_creationCompleteHandler(event)" 
            dataProvider="{getMostViewedResult.lastResult}" editable="true">
       <mx:columns>
            <mx:DataGridColumn headerText="thumbNail" dataField="thumbNail">
               <mx:itemRenderer>
                <fx:Component>
                 <mx:Image source='{data.thumbNail.toString().split("\"")[1].toString()}'  height="100"/>
                </fx:Component>
              </mx:itemRenderer>
            </mx:DataGridColumn>
            <mx:DataGridColumn headerText="length" dataField="length"/>
            <mx:DataGridColumn headerText="playerURL" dataField="playerURL">
             <mx:itemRenderer>
              <fx:Component>

               <mx:LinkButton label="Watch!" click='navigateToURL(new URLRequest(data.playerURL.toString().split("\"")[1].toString()))'/>
              </fx:Component>
             </mx:itemRenderer>
             </mx:DataGridColumn>
             <mx:DataGridColumn headerText="rating" dataField="rating"/>
             <mx:DataGridColumn headerText="viewCount" dataField="viewCount"/>
       </mx:columns>
</mx:DataGrid>

Now save it and run the application.

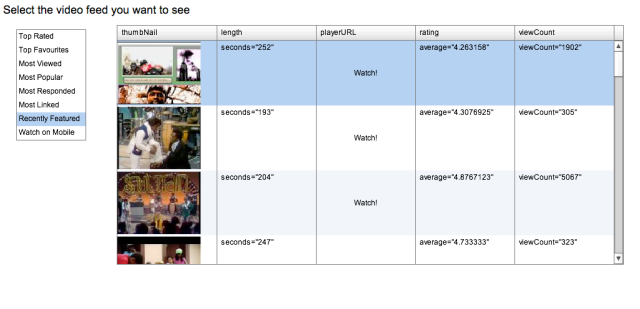
You should see something like this –

Picture 10

Posted in Uncategorized | Tagged , , , | Leave a comment

Adobe Flash Builder 4 Beta is out!

Get it here.

http://labs.adobe.com/technologies/flashbuilder4/

Some of the cool features in Flash Builder 4.

  • Data Centric Development (DCD) – Build applications easily around your data without having to worry implementing binding data.
  • Network Monitor – Record & Monitor your network calls.
  • FlexUnit integration
  • Event handler generation    and many more.

In the coming days I will be blogging about using Flash Builder to easily develop eye-catching applications. So visit this blog again after sometime 🙂

Posted in Uncategorized | Tagged , , | Leave a comment